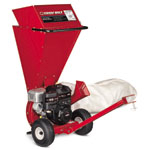
The Troy-Bilt TB154 Electric Cultivator
Listen to this review
Watch video of the cultivator in use
When I moved to Los Angeles 22 years ago, I left behind my grandmother's � acre garden and our own � acre plot behind the house. I thought little of gardening for almost 10 years. Some people are good with houseplants. I am not one of them. So gardening was fondly remembered as something I did way back when.
It seemed like everyone in my hometown (
New London, Ohio, pop. 2600) tended a garden and I spent my childhood with a hoe in my hand, riding a lawn mower, behind huge rototillers and eventually driving tractors around our small farm.
Finally, twelve years ago we purchased our first home and inherited a 10 year old, quite mature, garden. My wife and I typically tended the garden with shovel and hoe, but when I received an offer from
Troy-Bilt to review some of their products, I jumped at the opportunity. We have a variety of beds on the property and after 12 years they could all use a bit of TLC. I thought an electric cultivator could help a lot.
The
Troy-Bilt TB145 Electric Cultivator(Click to get more info from the Troy-Bilt web site) arrived in a box about 4'x 2' we found on the porch one day after returning from Little League practice. I was eager to try it out, so like a typical user, I opened it up, set the owner's manual aside (of course) and put the cultivator to use. The only assembly required was attaching the handle, which took about 5 minutes and no tools.
The first task was a rose bed that, after being dug up for a sewer line replacement, was buried in tall grass. I had used a hoe to clean out the bed once already and couldn't face doing it by hand again. Thankfully this tool arrived just in time.
I was immediately surprised by the power in this small electric unit. I could easily pick it up with one hand, but it was cutting through the grass and quickly cultivating the bed to to 6" or more. Since it is so small, maneuvering it around the existing rose bushes was no problem. The bed itself is probably only about 3 feet wide, bordered by a cement block wall on one side and rustic wooden edging on the other.
The long grass would occasionally wind up around the tines, but the cultivator is designed with quick release pins on each end that allowed me to simply pull off the tines, remove the grass and get right back to work.
Managing the electrical cord is always a concern with a device like this. (I have cut the extension cord with my hedge trimmers at least 3 times (!!!). The cable management is well designed with a simple clip to hold the extension cord towards the back of the unit and along the handle so it is always in your sight and within easy reach of your hands.
For me, personally, this is a great unit that fits well with my environment and I already have 4-5 more jobs waiting for it.
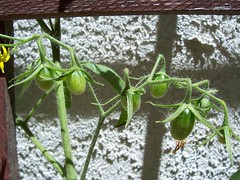
The next weekend we brought out the cultivator to work up another small bed where we planned to put some tomato plants. I had picked up 3 seedlings from
Tomatomania (
Watch the video) in nearby Encino and was eager to get them, and a small pot of basil, into the ground. This bed was even narrower than the first and surrounded by cement on two sides and the stucco of the house on the other. I thought about taking the outside tines off the unit, but the full width ended up being fine.
On this bed, I first laid out about 6 cubic feet of compost recently harvested from our old compost bin and then used the cultivator to work this into the existing soil. Again, the unit did a great job and quickly we had a nice, fluffy bed for the tomatoes. The tines handled the inevitable contact with the edges of the cement driveway with no ill effects. The blades showed no damage and simply bounced off the cement.
Overall, the cultivator works well as an all-purpose cultivator for a small to medium-sized garden. Those with large expanses of open garden would probably opt for a bigger, gas-powered unit. The
TB145 would also be an excellent "second machine" for small beds and hard to reach areas such as annual beds, shrub beds and cultivating between rows in a small vegetable garden.
For me, personally, this is a great unit that fits well with my environment and I already have 4-5 more jobs waiting for it.
Link:
Troy-Bilt TB154 Electric Cultivator Specs and Information at TroyBilt.com